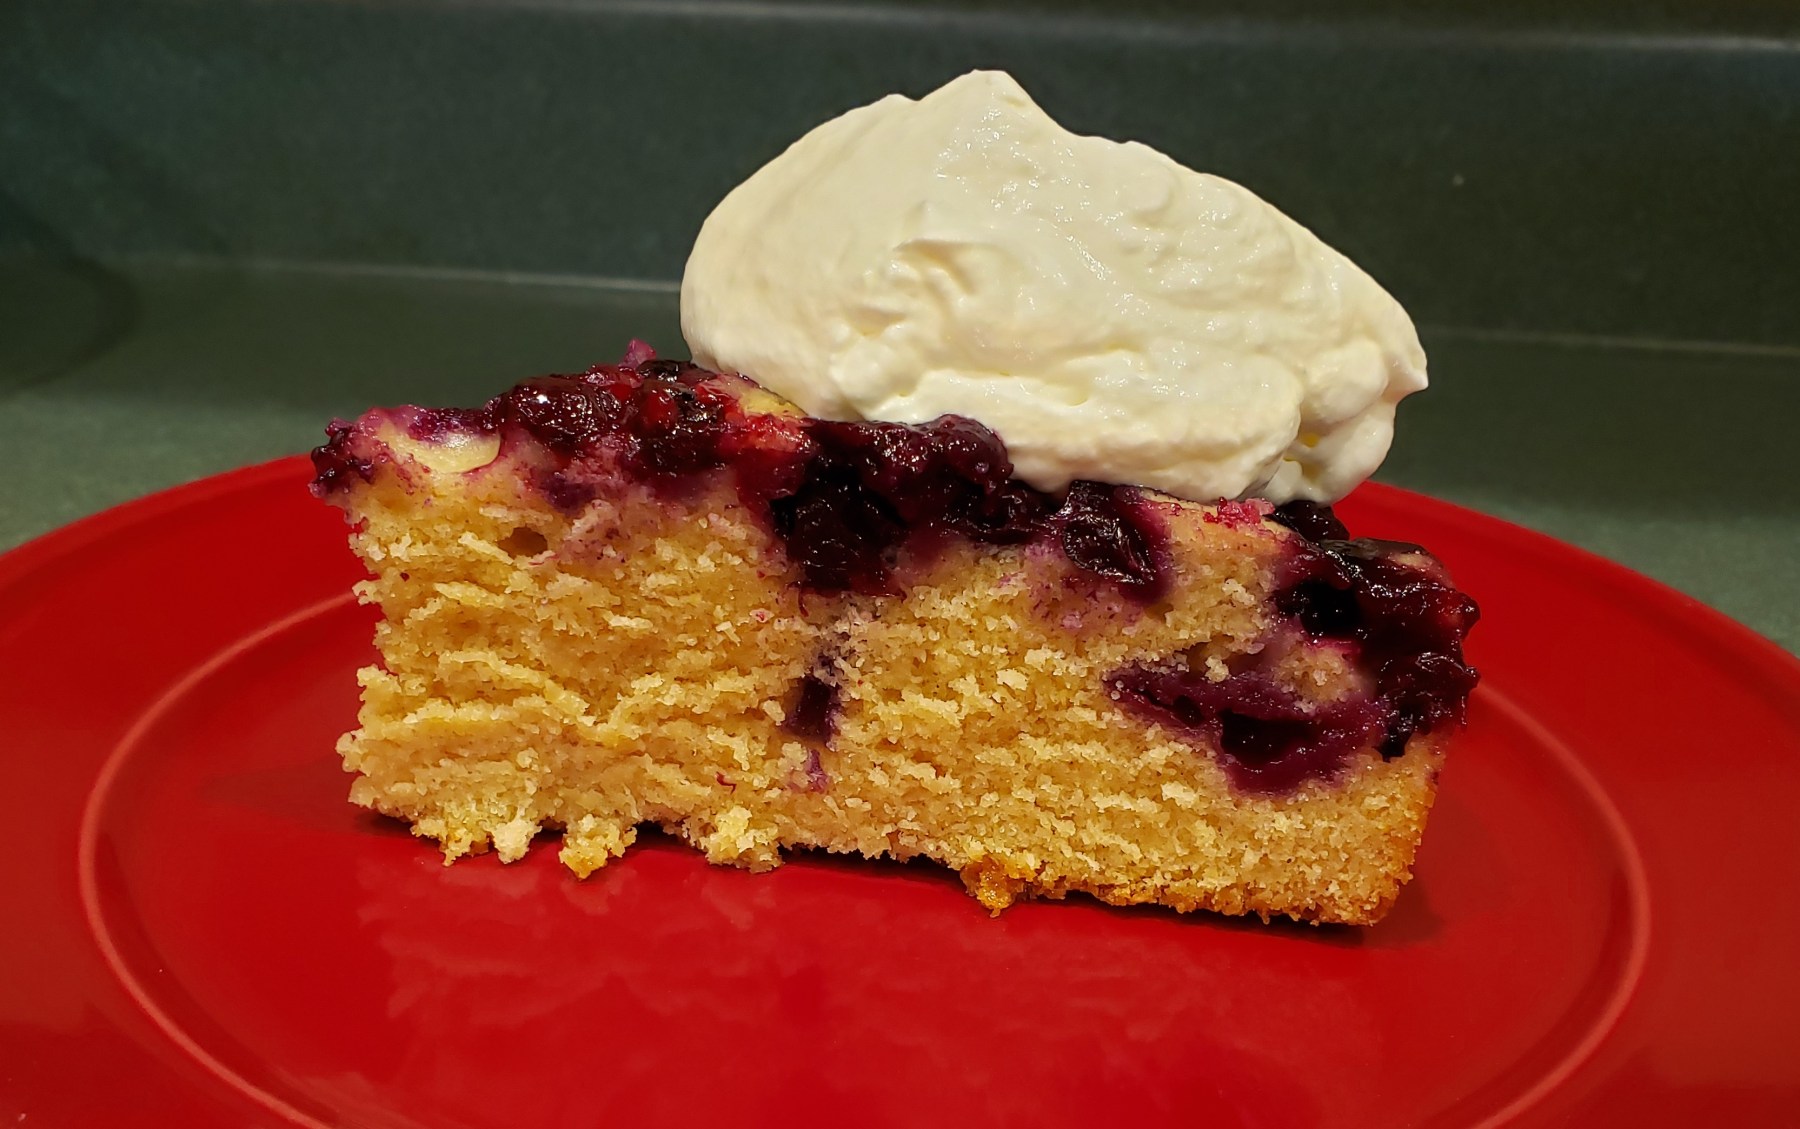
I love kitchen tools, gadgets, serveware, glassware – if it’s used in or around the kitchen, I’m a likely customer. However, no matter how many tools and gadgets I own, it still have my very favorites. In my top 5 list of must-haves, in include the following:

  • Kitchen Aid Stand Mixer
  • Kitchen Aid Hand Mixer
  • Wusthof Knives
  • OXO potato and vegetable peeler
  • Iron skillet that came from my Mom and Granny

No matter what I’m cooking, one of these items is nearly always in use. My husband and I always argue that it takes the right tool of the right quality to do the best job, no matter if it’s in the wood shop, the garage or the kitchen.

What are your favorite kitchen tools?

The right tool+the right quality=the best job

My husband, as well as many of my children and grandchildren, adore coconut cream pie. Although this one isn’t the one I grew up making, it is the recipe that I found most closely matched the pie we had at Malone’s in Lexington, KY. In fact, my husband was so taken with this pie that we made a special detour on our last trip just so we could go to Malone’s and get the pie. This recipe is from DelishCooks and it checks all the boxes for being easy to make, uses ingredients I usually have on hand, and tastes wonderful!

Ingredients:

1 cup sweetened flaked coconut

3 cups half-and-half

2 eggs, beaten

3/4 cup white sugar

1/2 cup all-purpose flour

1/4 teaspoon salt

1 teaspoon vanilla extract

1 (9 inch) pie shell, baked

1 cup frozen whipped topping, thawed

Directions:

Preheat oven to 350 degrees F (175 degrees C).

Spread the coconut on a baking sheet and bake it, stirring occasionally, until golden brown, about 5 minutes.

In a medium saucepan, combine the half-and-half, eggs, sugar, flour and salt and mix well. Bring to a boil over low heat, stirring constantly. Remove the pan from the heat, and stir in 3/4 cup of the toasted coconut and the vanilla extract. Reserve the remaining coconut to top the pie.

Pour the filling into the pie shell and chill until firm, about 4 hours.

Top with whipped topping and with the reserved coconut.

Easy to make, tastes fabulous and uses ingredients you usually have on hand in the pantry.

It’s Vidalia onion season and I went out looking for a recipe for something new and different to highlight these wonderful, sweet gems. Something that made onions the star (without making onion rings). I found several recipes for onion galettes and decided to give it a try. I ended up going my own direction and using up multiple things I had on hand.

4-5 medium Vidalia onions, peeled, halved and thinly sliced
4 tablespoons butter
1-2 cloves garlic, finely minced
Kosher salt and freshly ground black pepper to taste
1 teaspoon thyme
2 tablespoons flour
1/2 cup heavy cream
1 cup grated parmesan cheese
1 1/2 cups grated mozzarella cheese
1 egg, beaten
1 pie crust (use your favorite recipe or a prepared refrigerated crust)

To make the onion filling:

On medium-low heat, melt the butter in a large skillet. Add the onions and saute for about 5 minutes. Add the garlic, salt, pepper and thyme. Continue cooking until the onions are soft and translucent. Stir in flour and add the heavy cream. Continue cooking until the mixture thickens.

Grease a baking sheet or cover with parchment paper. Roll out the dough to about a 12 inch circle and place on the baking sheet. Place half of the mozzarella cheese and parmesan in the center of the pie crust, spreading to within about 2 inches of the edge of the crust. Spread with the onion mixture. Add the remaining mozzarella cheese and parmesan to the top. Reserve a couple of tablespoons parmesan for garnish. Fold the dough up around the edge and pleat it as you work your way around the galette. Brush the crust with egg and sprinkle with the reserved parmesan cheese.

Bake in a preheated 350 degree oven for 25-30 minutes or until golden brown.

A great variation: cut bacon into bite size pieces and saute until crisp. Add to the onion mixture.

If you’re tired of plain old ordinary Sloppy Joe’s, try this new twist on your old favorite. Courtesy of G-Que BBQ, this recipe is simple but packs a great flavor thanks to the smoking process.

2-2 1/2 pounds ground beef
kosher salt and fresh ground pepper to taste
1 green bell pepper, chopped
1/2 red bell pepper, chopped
1 medium yellow onion, chopped
1 1/2 cups ketchup
2 teaspoons yellow mustard
2 tablespoons brown sugar
About 1/2 cup water, or more as needed

Mix together the beef, seasonings, peppers and onion. Spread out in an aluminum foil pan, exposing as much surface of the meat as possible. Place on smoker that has been prepared with oak and hickory and is at 300 degrees. Cook the burger until it reaches an internal temp of 140 degrees. Drain the fat from the pan. Break up the meat into small pieces. Mix the ketchup, mustard and brown sugar. Add to meat mixture, add just enough water to make a moist mix. Return to smoker for 10 minutes. Stir the mixture and smoke for an additional 10 minutes.

Serve on buns.

This recipe was a “PaPa Cooks” recipe. It’s a team effort at our house.

I found this recipe on Taste of Home. It was appealing to me because it was simple, used ingredients that were always on hand and made an amount sufficient to share.

1 cup butter, softened
1 cup vegetable oil
1 cup sugar
1 cup confectioner’s sugar
2 large eggs, room temperature
1 teaspoon vanilla extract
4 1/2 cups all-purpose flour
1 teaspoon baking soda
1 teaspoon cream of tartar

In a large bowl, beat the butter, oil and sugars. Beat in the eggs until well blended. Beat in vanilla. Combine the flour, baking soda and cream of tartar; gradually add to the creamed mixture.
Drop by small teaspoonfuls on to ungreased baking sheets. Bake at 375 degrees until lightly browned, about 8-10 minutes. Remove to wire racks to cool.

These cookies had a very subtle vanilla flavor. I doubled it for a bigger vanilla taste.

My son, my sister and now my husband have all purchased Rec Tec Grills. And while they’re mastering the world of smoking and grilling, I explored one of the great side dishes Chef John from Rec Tec posted. Some people think that a great BBQ experience is all about the meats. And, while they’re certainly the star of the show, what’s a memorable BBQ without awesome side dishes? Here’s a salad that is sure to please even those who aren’t really into greens. And, as with most dishes, you can add, leave out or vary the amounts of most of the ingredients to suit your particular taste.

1 large head romaine lettuce, chopped
2 ears of corn, sliced from the cob
1 avocado, peeled and chopped
8-10 cherry tomatoes, cut in half
1 green bell pepper, chopped
1 can black beans, drained
1 jalapeno pepper, seeds and veins removed, chopped
1 cup shredded sharp cheddar cheese
1/2 small red onion, diced
fresh cilantro, minced
Freshly made ranch dressing

Toss the ingredients together with the chilled salad ingredients just before serving.

Choosing the perfect side to go with your grilled or smoked meats can take your BBQ from good to AMAZING!

I love the website Sally’s Baking Addiction. It’s one of my go-to spots for great recipes to try and I have yet to be disappointed in any recipe Sally has recommended. The ingredients and the process are very simple. The results were excellent.

Strawberries + Whipped Cream ingredients:

6-7 cups hulled and quartered strawberries
1/4 cup + 2 Tablespoons granulated sugar, divided
1 teaspoon pure vanilla extract
1 cup heavy cream

Sweet Biscuits:

3 cups all-purpose flour
1/4 cup sugar
2 Tablespoons baking powder
1 teaspoon salt
3/4 cup unsalted butter, cold and cubed
1 cup cold buttermilk
2 Tablespoons heavy cream
Coarse sugar, for sprinkling

Instructions:

Start with the strawberries: Stir the strawberries and 1/4 cup granulated sugar together in a large bowl. Cover and set in the refrigerator until ready to use. This time allows the strawberries to release their delicious juices.

Make the biscuits: Preheat oven to 425 degrees. Mix the flour, sugar, baking powder, and salt together in a large bowl or in a large food processor. Whisk or pulse until combined. Add the cubed butter and cut into the dry ingredients with a pastry cutter.

Pour buttermilk on top. Stir everything together until just about combined – do not overwork the dough. The dough will look like shreds and be very crumbly. Turn the dough out onto a work surface and gently mold it together in a ball using your hands. Gently flatten until it is evenly 1/2 inch thick. Cut into 3-inch circles. Re=roll any scraps until you have about 12 biscuits.

Arrange on on a lined baking sheet.

Brush the tops with 2 Tablespoons heavy cream (or buttermilk) and sprinkle with coarse sugar. (I used vanilla bean sugar). Bake for 15 minutes or until biscuits are golden brown on top. Remove from the oven and allow to cool for 10 minutes before assembling.

Make the whipped cream: Using a hand mixer or a stand mixer fitted with a whisk attachment, beat the heavy cream, 2 Tablespoons granulated sugar, and vanilla on medium-high speed until soft-medium peaks form, about 3 minutes.

Slice the biscuits in half and layer with strawberries and whipped cream. Serve immediately.

Recipe originally posted on Sally’s Baking Addiction.

These sweet biscuits remind me a bit of a moist scone. In fact, I can recommend that the leftover biscuits are great with a cup of coffee or tea the next day!

This is the most requested menu item at all family gatherings. If I don’t make it, I might as well not attend. I got this recipe from my mother-in-law, the original Grandma Croy.

1 package (3.4 ounce) instant vanilla pudding
1 cup milk
8 ounces Cool Whip, thawed
1 can (11 ounces) mandarin oranges, drained
1 cup miniature marshmallows
1-2 bananas, sliced
10 fudge stripe cookies, broken in pieces about the size of a dime, reserving a handful for garnish

In a large bowl, mix together the pudding mix and the milk until it thickens. Gently fold in the whipped topping. Add in the rest of the ingredients, stirring until mixed. Garnish the top with the reserved cookies. Chill until ready to serve (it’s best if chilled overnight).

Layla’s Rules for Making Cookie Salad:

1. The cook gets to sample the cookies first.

2. The cook gets possession of all marshmallows that miss the bowl.

3. It’s perfectly legal to steal mandarin oranges from the can as long as the cook’s hand is small enough to fit.

4. The cook gets to lick the spoon (Grammy’s addendum to rule 4 – the cook can’t put the spoon back in the bowl after she’s licked it.)

I have learned, from personal experience, that I tend to embrace the “art” of cooking more than the “science.” I love to have the freedom and latitude to do what I want and what I feel. Some recipes, especially baking and candy making, are much more strict when it comes to the measurement or weight of ingredients and the combinations that create magic. And, although I love to bake and make the occasional complex recipe, I find true enjoyment in experimenting with what tastes good, is on-hand and in-season.

It’s all about choices. Cooking is very subjective. I’ve had people tell me a recipe is a must-try and the best they’ve ever had, and I’m left scratching my head and wondering what was special about it. One person’s “best ever” is always going to be someone else’s “no thanks.”

Cooking and eating is a matter of taste. You may have always hated a treasured family recipe because it used black walnuts. There’s no rule that says you have to use black walnuts. Maybe you’re a fan of pecans or pistachios. Or, maybe you don’t like nuts at all. Be brave. Change the recipe if it makes you happy. Use what you love and it will be a more enjoyable experience for you.

All of this to say, with any of the recipes I post, it may not be true to what you may have seen elsewhere. I may credit a recipe I’ve found online and tweaked it a bit to suit my own sense of taste. I give you absolute permission to do the same with anything I share with you. Embrace not only the science, but the art of cooking.

And now to leave you with what is one of the most important subjective questions for any cook:

Are you a grape jelly or strawberry jam person? Your comments are welcome.

My mother-in-law, Dorothy Croy, introduced me to her special concoction when I married her son. The ingredients are simple and, as everyone in our family and circle of friends agrees, you either love it or you hate it.

To make 1 gallon of Grandma Croy tea:

Steep 3 large family size teabags of your favorite regular black pekoe tea (I use Luzianne), with 3 regular size teabags of Constant Comment tea in about 8 cups of water.
Pour 1-1 1/2 cups sugar in a gallon size pitcher. Add the hot, steeped tea, stirring until the sugar is dissolved. Add cold water until the pitcher is full.

Refrigerate until chilled and serve over ice.

Warning: This tea is addictive.